Friday, September 20, 2013

Introducing our Makerspace, with little emphasis on space

Well, our first Maker Club sessions of the 2013-2014 school year seemed to be a success.  "Maker Mondays" are being successfully implemented into my science curriculum for the first time this year, picking up the slack from our recently dismantled technology program.

I initially gave all the credit to our new classroom "Makerspace" (pictured to the left), but I'm starting to rethink things.  Don't get me wrong, this piece of furniture - donated by my roommate when she decided to reorganize her room - was an incredible windfall.  After weeks of combing local used office equipment spaces and other recycling establishments (like Urban Ore), I would have been thrilled with even a functional shelving unit.  But then this - with coordinating doors, drawers, and the desk - w00t!

If someone would have told me last year that I could fit this large additional piece of furniture in my classroom, I would have laughed.  To give you an idea, here is a picture (below) of my science classroom from the far back corner of the room.  It is not large by any means, and space is at a premium.  With 24 eighth graders in there, things get pretty tight.  But, we figured out a way to make it work.


If you look to the far right of the picture, you might also see three 4-foot tables that I rescued from various spots from around the school.  After tightening some screws and lining them up, they represent our "design studio" with a couple of old laptops, our Makerbot* and our newest Printrbot*.  These tables, in addition to the shelving unit required us to push the lab tables even closer together.

But the loss of space due to the additional furniture was worth it, for it made a dedicated space for all of our tools.  We have a bin for MaKey MaKey*, Arduino*, Raspberry Pi* and a LilyPad*.  We also have drawers designated for batteries, safety glasses, duct tape, measuring tapes, sewing supplies*, felt* and timers.  We have shelves for our one set of Makedo*, books* (including my favorites!), Make Magazines*, a used Kinect scanner*, clipboards & small dry erase boards for planning, and a bunch of items from a resale shop that we hope to eventually 3D scan.  We have a bin clearly marked "tools" and a designated space for the soldering iron* and glue guns.  There's even a bin labeled "raw materials" which hold cardboard and other assorted scraps for spontaneous making.

What is most interesting to me is that, besides the electronics equipment, most of these materials are not new in my classroom.  What is new is their visibility and accessibility.  Before, these supplies lived in a bin or in some cabinet, only to be taken out when part of an activity in the curriculum.  But now, students have been coming in on their free time and lunch periods to calibrate the Printrbot or expand on some idea they are working on with MaKey MaKey.  When some kid comments, "I think the gear is stuck," another student will respond by grabbing the pliers out of the tool bin, or when some kid lost the plastic scraper for our 3D printer, another kid jumped on Thingiverse, downloaded an stl file, and printed a replacement.  For the first time, students do not have to go through me to access the materials - they figure out what they need and know where to find it.  And they are starting to train each other how to use the various equipment, increasing their own buy-in, and decreasing my workload!  It feels like a working space, and the kids are taking advantage of it.  We even have a Google Doc linked off our class wiki where kids post things "we" need (currently: conductive thread/paint, an HDMI to VGA converter, etc).

If someone would have told me last year that I could make a makerspace in my room, I would have been quick to list all of the limitations of my teaching situation: I don't have enough time, materials, budget or training.  I don't have the support of a university, a grant, or other donations.  But, we started small and took it one step at a time.  For my budget, I started (well before the shelving unit arrived) with an after school 3D Printing (eventually renamed "Maker") club.  To my advantage, students do pay for extracurricular activities at my school and, like many start-ups, I chose not to give myself a 'salary' the first few trimesters, instead using that extra money to buy materials.  (All of the starred materials above (*) were paid for out of my pocket.)  To fill the role of "lab coordinator," I used these self-selected, motivated, after-school kids to experiment with the tools and become the experts I could later use in my science class.  And time... well, yeah...  I spent a LOT of time playing, learning, and developing a network of resources.  But when you love what you do, the line between work and fun is often blurred.

So, do I wish I had more space for student to tinker and make things?  Absolutely.  But I knew I couldn't wait until I had the perfect space (and materials) to make that happen.  Instead I had to make the space - both physical and (more importantly) perceived.  I used to give all the credit to that shelving unit, but we're starting to realize that the shelf does far more than just hold the supplies, it helped shift the attitude from classroom to makerspace by keeping already existing tools visible and accessible, and empowering the kids to use them.


If you want to read more about the specifically 3D printing things we are up to, you can visit the blog I created with the kids: Tales of a 3D Printer.

_________________________________________________

Added 11.2.13: Here are some resources I find myself referring back to: an Edutopia article on Designing a School Makerspace, the MAKE article Is it a Hackerspace, Makerspace, TechShop, or FabLab? and an instagram photo of a makerspace I aspire towards!

Here are some other local under-construction makerspaces (updated)

Sunday, May 12, 2013

Video of Mark Hatch, CEO of TechShop, presenting at Design Night at the Autodesk Gallery in San Francisco on Thursday May 2, 2013.  This session was entitled "Making it!"  Unfortunately, I did not get my act together soon enough to get tickets before they sold out, but thanks to the wonders of technology, I can re-live the experience on the web! :)


Monday, April 01, 2013

From STEM to STEAM Education


Many of us are familiar with the acronym behind STEM education - Science, Technology, Engineering, and Mathematics.  However, I was recently introduced to a new acronym - STEAM - which includes an "A" for "Art & Design."

Now, this buzzword is not new (it's been around since at least 2011, or even 2007, from what I can tell) but it is new to me, and I like it!


From what I can tell, STEAM is a movement that came out of the Rhode Island School of Design (RISD) and, according to the STEM to STEAM website, aims to


  1. transform research policy to place Art + Design at the center of STEM
  2. encourage integration of Art + Design in K–20 education
  3. influence employers to hire artists and designers to drive innovation


The focus was put on STEM education many years ago, but to be truly competitive, it's about more than just math and science, it is about creativity and innovation; critical thinking and problem solving; and communication and collaboration.  It's about art & design.

Some sources say (well, Thom Markham says) the term STEM was first coined in the 1890's by the Committee of Ten at Harvard, as a response to the gaps in the agrarian school system of the 1800's.  Other sources point to Dr. Judith Ramaley, president of Winona State University in Minnesota, who is said to have coined the term "STEM" when she was assistant director of the education and human resources directorate at the National Science Foundation from 2001 to 2004. (Previous to her, apparently the acronym was "SMET.") Ew.

For now, especially with my interest in the Maker movement, I will adopt the acronym STEAM to inform my own teaching in science & technology.


Monday, February 18, 2013

The Benefits of Pruning

So, my blog has been sorely neglected over the past few years.  Right now it is cluttered with draft posts, links and images in a private Tumbler of ideas.  Sprinkled throughout is the occasional posts, released in a burst of creative energy and prioritization.  However, my blog is mostly neglected as the demands of teaching relegate it to the back burner.

My blog is also competing with the immediacy of social media.  Share a link, or toss up a shortened URL on Twitter, and one quickly receives feedback and commentary from the crowd.  As immediately gratifying as this may be, it doesn't really take the place of blogging, a process that (at its best) forces me to consider multiple sources before assimilating those ideas with my own viewpoints, distilling them to what matters in my particular context, and then writing them down. I don't really blog for the crowd; I do it for me.

Public Domain
And, so, in resurrecting this blog, I've considered the analogy of the Phoenix - that mythical bird with its colorful plumage and a tail of gold and scarlet. The bird that, at the end of its 500 to 1000 year life-cycle, builds itself a nest of twigs that it then ignites; "both nest and bird burn fiercely and are reduced to ashes, from which a new, young phoenix or phoenix egg arises, reborn anew to live again."  (Wikipedia)  It's tempting to just destroy this blog and start anew, creating a new space from its ashes, but that analogy was not quite what I was looking for.

I've considered, instead, the act of pruning bushes. This seems more apropos to my goals.  The University of Rhode Island offers this Pruning Guide.  "Pruning is a regular part of plant maintenance involving the selective removal of specific plant parts."

CC-BY-SA by Hirvenkürpa
Why prune?  The site goes on to offer these reasons:

1) To improve the appearance or health of a plant.
2) To control the size of a plant.
3) To prevent personal injury or property damage.
4) To train young plants.
5) To influence fruiting and flowering.
6) To rejuvenate old trees and shrubs.

That's what my old blog needs - rejuvenation! I started blogging nearly 7 years ago, and over the years have more clearly focused my ideas and vision as a teacher.  I plan to start by pruning away those previous posts that serve as a distraction to my professional goals.

Then, perhaps, my blog will grow healthier and stronger than before.  Of course, this requires that I actually write.  And teaching tends to fill up my to-do list, leaving little time for much else.  However, it's good to have goals.

Saturday, May 29, 2010

Facebook Safety Center

As a middle school teacher, I was thrilled to learn Facebook has created a new Safety Center for parents, educators, law enforcement, and kids.

Not only does it have good advice, it has realistic advice. For example, check out these tips for parents (found under the section "Can I friend my teen?"):

Don't fill your kids' pages with your comments. As it is, simply having parents is mortifying enough at this age. Their friends don't need evidence of your existence (and you can always send them private messages).

Don't be techno-phobic. Don't be afraid of technology. Learn to text, send a mobile photo, set up a Facebook profile, upload a video. Or have your kids show you how. It's impossible to guide what you don't understand. Not only that, but think of all the anxiety you can avoid by knowing how things work.

For all those parents who contact me, not knowing where to start with their 13 year old and social networking, I will be sharing this new resource.

Tuesday, May 04, 2010

Open Educational Resources (OER)

So, a few days ago, I had the pleasure of attending my first CC Salon SF. I was excited, since I am currently a little obsessed with Creative Commons and copyright, and I work part-time for the open source respository, Curriki. Although, I was somewhat disappointed to find out I was the only currently practicing teacher there. Although I understand; it was a school night. :)

Not to worry, the presentation is archived online.

I think all educators need to start paying attention. The dynasty of the textbook is coming to an end. I was introduced to resources such as CK-12 Flexbooks, Connexions, OER Commons, CLRN Free Digital Textbooks, and the Flat Classroom Project. With all of these free or inexpensive, customizable resources - what it the draw of the typical textbook?
Open Educational Resources are all about sharing.

In a brave new world of learning, OER content is made free to use or share, and in some cases, to change and share again, made possible through licensing, so that both teachers and learners can share what they know. (OER Commons)

Want to find some OER for yourself? Curriki lists 10 great OER search engines on their blog.

More on this later...

Thursday, April 01, 2010

Citing Internet Sources

The most common guidelines for citing sources come from the MLA. The Modern Language Association of America is the main professional association in the US for scholars of language and literature. The other common guidelines come from the APA (American Psychological Association).

I learned that in April of 2009, the newest MLA Handbook was released, and it made a few important changes (from the Write Source).

  • Underlining is no longer recommended to represent italics. Use italics instead.
  • Within the list of works cited, all entries must be identified by medium: Print, Web, DVD, CD-ROM, PDF file, and so on. List the appropriate medium(s) at the end of each entry. In the case of a Web source, the date of access follows the word “Web.”
  • Online sources no longer require a URL listing**.

So, what does this mean for you, kids? Well, if you want to cite an Internet source, here's what you need to do. Keep in mind that complete publication information may not be available for a website; so you should provide what is given. You should try and find the following information before you begin:

  • Author and/or editor names (if available)
  • Article name in quotation marks (if applicable)
  • Title of the website (in italics)
  • Any version numbers - revisions, posting dates, volumes, or issue numbers.
  • Publisher information, including the publisher name and publishing date. (it is suggested that you use use n.p. if no publisher name is available and n.d. if no publishing date is given.)
  • Date you accessed the material. (This is important because web pages often change, and information on the page may no longer be the same later)
  • Medium of publication (in most of our cases, this is "Web")
  • URL (if required, or for your own personal reference).


TO CITE AN ENTIRE WEB SITE
(simplified):
(NOTE: The color-coding in just to help you organize. The actual citation should be in plain black text.)

Editor or author name (if available). Name of Site. Version number. Name of institution/organization affiliated with the site, date of resource creation (if available). Medium of publication. Date of access.

Example:
Windows to the Universe. National Earth Science Teachers Association, n.d. Web. Accessed in Nov 2009.

TO CITE A SINGLE WEB PAGE (simplified):

Author name. "Title of page." Name of Site. Version number. Name of institution/organization affiliated with the site, date of resource creation (if available). Medium of publication. Date of access.

Examples:
Strickland, Jonathan. "How Does the Internet Work?." HowStuffWorks.com. Discovery, n.d. Web. Accessed on April 4, 2011.
"Twitter." CrunchBase.com. n.d. Web. Accessed on April 10, 2011.

Byrne, Richard. "Six Easy Ways for Students to Create Videos Online." Free Technology for Teachers, November 29, 2009. Web. Accessed in Feb 2010.
"How to Make Vegetarian Chili." eHow.com, eHow, n.d. Web. Feb 2009.


Want to know more? Visit the Purdue OWL site. Or, you could give the online Citation Machine a try!


** Important Note on the Use of URLs in MLA

"MLA no longer requires the use of URLs in MLA citations. Because Web addresses are not static (i.e., they change often) and because documents sometimes appear in multiple places on the Web (e.g., on multiple databases), MLA explains that most readers can find electronic sources via title or author searches in Internet Search Engines.

For people who still wish to require the use of URLs, MLA suggests that the URL appear in < angle brackets > after the date of access. Break URLs only after slashes."


So, it would look like this:
Strickland, Jonathan. "How Does the Internet Work?." HowStuffWorks.com, n.d. Web. April 4, 2011. < http://computer.howstuffworks.com/internet/basics/internet.htm >

"Twitter." CrunchBase.com. n.d. Web. Accessed on April 10, 2011. < http://www.crunchbase.com/company/twitter >

Byrne, Richard. "Six Easy Ways for Students to Create Videos Online." Free Technology for Teachers, November 29, 2009. Web. Accessed in Feb 2010.
< http://www.freetech4teachers.com/2009/11/six-easy-ways-for-students-to-create.html >


Saturday, March 20, 2010

Search Strategies - More than "Just Google It"

Every year, I ask my 6th grade students to respond to the following prompt in their Tech journals: "Describe your strategies for researching using the Internet." Without fail, at least 80% of them will respond with something like, "I type a word into Google and then click on the first website listed" or "I go straight to Wikipedia."

So, I think it time to teach Internet search strategies a little more explicitly. (Even the New York Times recently posted a lesson plan for dealing with Internet searching skills.)

These are the search strategies I start with for my students when they begin their projects:
  1. Take note of the domain names types (.gov & .edu tend to have most "reliable" info)
  2. Check the "About Us" to see if the site seems reliable. Sometimes "Contact Us" or "FAQs" or that site's own blog can also provide valuable hints to a page's reliability.
  3. Try searching -.com or +.edu. (ex: Twitter -.com) NOTE: There is no space between the "-" and the domain name type.
  4. Try putting your search item in quotes. (ex: "history of Mt. Vesuvius" instead of just history of Mt. Vesuvius)
  5. Try subtracting or add words (for example type 'Tiger -Woods' to search for info on the animal.) NOTE: There is no space between the "-" and word you are subtracting.
  6. Try clicking on the little superscript numbers in Wikipedia articles to find out the source that is used. Or, just scroll down to the bottom of the Wikipedia article and look over all of the sources used.
  7. Try searching popular news, tech, or science sites - (Newsweek, Time, New York Times, SFGate, Gizmodo, TechCrunch, CrunchBase, USGS, National Geographic, etc. (ex: "Foursquare +Chicago Tribune")
  8. Use other media as sources for information, such as videos (TED talks, YouTube interviews) or podcasts (KQED, NPR)
Still need more help? Try these links: Using Search Engines, Develping a Search Strategy, and 10 Simple Google Search Tricks (NY Times)
And, don't forget when you are searching to cite the websites you use!

Friday, March 05, 2010

Using Images in the Classroom: Copyright, Fair Use and Creative Commons

As a Technology teacher, I feel obligated to model good intellectual property habits for my students. The problem is, I am not completely clear on the rules myself! I am very thankful for the nonprofit Creative Commons site for helping me start to make sense of it all.


As teachers, we often claim "fair use." The Fair Use doctrine generally allows for the copying of protected material (texts, sounds, images, etc.) for a limited and “transformative” purpose, like criticizing, commenting, parodying, news reporting, teaching the copyrighted work. Under the US copyright laws, fair use “is not an infringement of copyright.” When determining Fair Use, judges typically consider four factors. Read more....

However, I am trying to teach my students to forgo their typical Google Image search or pop song soundtrack and really start to think about intellectual property rights. I am no longer hiding behind the approaches: "well, we're not publishing it, so no one will notice" or "it's only a problem if you get caught."

Here is what I know so far:

Copyright - [MOST RESTRICTIVE] Creative work is under copyright protection the moment it is created and "fixed in a tangible form." All sorts of creative work are protected including images, songs, and written work. People do not need to register with the Copyright Office to benefit from copyright protection, but the will need to if they ever plan on bringing suit against someone for copyright infringement. If a student wants to use copyrighted material in their presentation or website, they really need to contact the creator for permission. (My students do NOT like this rule.) I tell students that if the rights are not specified, assume it is copyrighted.

Public Domain - [NO RESTRICTIONS] "When a work is in the public domain, it is free for use by anyone for any purpose without restriction under copyright law. Public domain is the purest form of open/free, since no one owns owns or controls the material in any way." Mostly, this includes resources that are government work (USGS, NASA) or very old. Cornell University has an updated table of copyright term and public domain rules.

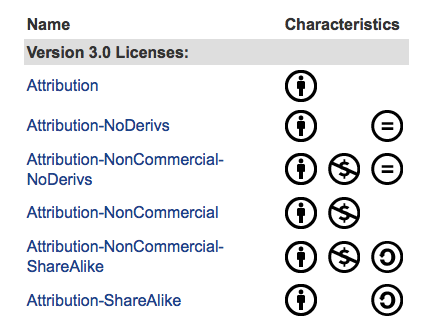
Creative Commons - [SOMEWHERE IN THE MIDDLE] This is a way to modify your copyright to allow for sharing, remixing or distribution of your work. There are many "levels" of creative commons licensing. On this page, creativecommons.org lists them starting with the most accommodating license type through the most restrictive license type.


There are six major licenses of the Creative Commons:
  • Attribution (CC-BY)
  • Attribution Share Alike (CC-BY-SA)
  • Attribution No Derivatives (CC-BY-ND)
  • Attribution Non-Commercial (CC-BY-NC)
  • Attribution Non-Commercial Share Alike (CC-BY-NC-SA)
  • Attribution Non-Commercial No Derivatives (CC-BY-NC-ND)
Generally, the licenses address different requirements for attribution , share-alike commercial use, and allowing derivative works (can you modify it).

There are four major conditions of the Creative Commons: Attribution (BY), requiring attribution to the original author (giving the author credit); Share Alike (SA), allowing derivative works under the same or a similar license (how you will license any work you create from it); Non-Commercial (NC), requiring the work is not used for commercial purposes (you can't make money from it; and No Derivative Works (ND), allowing only the original work, without derivatives (you can't change it).
Additional options include the CC0 option, or "No Right Reserved." For software, Creative Commons offers three licenses: the BSD License, the CC GNU LGPL license, and the CC GNU GPL. (I'm still learning about those three....)
I encourage my students to start at the following sites to find CC or public domain images:

I know I have a lot left to learn, but at least I am encouraging my students to become aware of intellectual property rights and make it less likely that they will become "uninformed and unintentional plagiarists."

Monday, November 23, 2009

Brainpop Animations

I love Brainpop. I have used these videos in classrooms from 1st grade through 7th grade. Even though Brainpop is animated, the information is complex but presented in a clear and entertaining way. Each video is 2 - 4 minutes long, and my students especially enjoy Tim's themed T-shirts! The quiz is a great way to get whole class feedback. With a school subscription, you could use it in a computer lab, but I find it perhaps more useful to use an LCD projector and a screen, so that we can pause, replay and discuss portions of the videos.

Even though it is subscription-based (see below), there are a number of free videos you can check out.
I use these videos in three main ways:
  • INTRODUCTION: I might show a video first (ex: Black Holes) to spark kids' interest and help them generate questions about an upcoming lesson. Also, I can use the quiz as a pre-assessment of the class' collective knowledge.
  • REVIEW: After an activity (ex: kids acted out the life cycle of stars of varying masses), I play the video and hearing the vocabulary in the video helps them solidify their previous learning experience. (ex: "Hey - That's me! I was the nebula!")
  • EXTENSION: If students finish an activity early, or need more challenging content, I will have then watch other videos extending the current curriculum (ex: Big Bang, or often in Technology class, I will have advanced students watch information about binary code or the internet)
However I use it, the kids love it. Check out Brainpop or Brainpop Jr. for more information.
You can sign up for a 1 week free trial with an email address, and one year subscriptions range from Family ($99) to Teacher ($175) to School ($975) to customizable District options.

Friday, October 23, 2009

Worthwhile Workshops

I am sitting here in beautiful Palm Springs at one of my favorite conferences of the year - CSTA. This got me thinking about the best workshops I have attended. Here are my favorite the three that I felt were most organized, inspirational and worth the money!

Steve Spangler's Boot Camp
(K - 8, multiple locations): I have pined after Steve Spangler's Science in the Rockies for years, but had the opportunity to attend the more economical Boot Camp this fall in Chicago. It was wonderful. He is a businessman and comedian, but a teacher at heart. His presentations were concise, engaging and taught solid science concepts. Plus, you get a whole box of fun stuff to take home! The workshops should head west in the spring.

Project WET (CA) - There are various workshops offered throughout California. Upon completion of the workshop, participants get the Project WET Curriculum and Activity Guide. (The ONLY way you can get the book is through the workshop.) It covers chemistry and conservation topics around water and is truly outstanding. I was fortunate to take the workshop with Kathy Machado at the Santa Clara Valley Water District. She was an excellent facilitator, takes pride in the extensive work she has done at the Water District, and is able to offer the books for free. Her next workshop is March 5, 2010 and I can highly recommend her presentation. (All Project WET workshops are free, but some districts charge for the book.)

4-H Embryology
(Northern CA) - This was quite a drive up from San Francisco, but it was well worth it. June Stewart teaches a two-hour (free) Embryology class in Auburn, CA. I have never met anyone as passionate about and dedicated to teaching embryology as this woman. The workshop is generally in mid-February, and at that time you can order or pick up rented incubators, fertile eggs, and curriculum materials. These are not materials you will shove in a file cabinet somewhere. I used everything and my students enjoyed the experience immensely. I was terrified to hatch birds for the first time, but the program alleviated all of my fears. June is available by phone for any questions and the Extension office will take any un-adopted birds back for up to one year and place them in homes with local 4-H kids.

These are my top three. What's your favorite national or local gem?

Thursday, July 02, 2009

Did You Know?

As I was completing my video entry for the 2009 Google Teacher Academy, I kept coming back to a phrase I heard somewhere, "We are currently preparing students for jobs and technologies that don't yet exist, using technologies that haven't been invented, in order to solve problems we don't even know are problems yet." That line has stuck with me since I first heard it.

I meet so many teachers that think we are instilling knowledge into children. The best teachers think that we are teaching students how to think and learn, for most of the knowledge itself will become obsolete.

For my project, I was determined to find the source of this great quote.

My search led me to The Fischbowl blog and a post about the original PowerPoint presentation, entitled "Did You Know?," created by Karl Fisch and Scott McLeod. Apparently, XPLANE has reworked the information into this thought provoking video (2007).


UPDATE (7.6.09): Here is an even more recent version (2008).


This particular version has an expanded focus on the idea that "we are living in exponential times." This is truly incredible and no doubt has significant implications for education. This only strengthens my theory that, as a teacher, I don't know everything... I CAN'T know everything. I may be more educated and have more experience, but I am learning right along with my students every day.